Wednesday, December 21, 2011

Simple Ornament With Your Own Festive Photos!


I wanted to share a super easy last minute ornament gift I made with Mallory with some scrapbook paper and using these photos I took of them by the tree.


 I used my paper cutter to cut out a little rectangle and mounted it to a big rectangle.  I then used photo tape to tape the picture to the middle.

IMG_7549web


I found some scrapbook Holiday stickers/gems and Mallory helped decorate the ornament with stickers.

IMG_7550web


IMG_7554web


I used a hole puncher and made a hole at the top and used ribbon to tie through. I also used glitter glue to write the year.

So easy and ready to wrap for my grandparents for Christmas!

IMG_7560web


IMG_7561web


Thursday, December 15, 2011

Holiday Tradition- St. Nick

I had intended on this going up last week but still thought this was worth sharing if you are taking note of holiday traditions you'd like to start next year or sometime in the future.

My friend Tiffany at peanutblossom has been doing a series of posts called Stock Your Stash.  She and a few other guest posters have been sharing holiday gift guide ideas and have come up with some wonderful suggestions. Be sure to check their Stock Your Stash series on her blog (click on peanut blossom above to get there). One of the Stock Your Stash posts that Tiffany featured had to do with the St. Nick tradition.  I love how Tiffany tweaked this simple tradition  to better suit her own family!  She very kindly let me feature her post here to share with you all.  Thanks Tiffany!


Welcome to the second post in the Stock your Stash series. If you missed the first round, you can get all caught up here.
This week we're talking stocking stuffers for St. Nick. Does your family celebrate St. Nicholas Day? I know not everyone is familiar with this tradition, so you cancheck out a little snippet of an explanation here.
Growing up, St. Nick always brought my sister and me a wall calendar for the coming year and a box of chocolate covered cherries. He usually filled our stockings with Lifesavers and chocolate coins and tubes of M&Ms. My mom always said it was a perfect little teaser holiday to get us in the Christmas mood. 
Now with kids of my own, St. Nick has taken on a little bit of a change. When the Peanut was just a year old, a wall calendar and cherries didn't seem exactly appropriate. St. Nick came up with a substitute that was much more fitting and luckily it has grown with her over the years. 
When each of my girls empty their stockings this year they will discover:
- a new Christmas picture book
- a single holiday movie for the family to enjoy
- matching Christmas pajamas
- an ornament for the tree
And in lieu of too many candies I don't really want them indulging in (anyone else STILL have Trick or Treat bags laying around?!) St. Nick brings us a family treat platter for sharing. 


Oddly enough, this treat basket was the item that was the most memorable for the Peanut last year. She has specifically asked whether I think we'll be getting it again this year.  2011111802
Items found on our festive red platter include: 
- "Snowballs": white cheddar puff balls
- Yardstick of popcorn kernels
- Red velvet pancake mix
- Raspberry white chocolate & Eggnog flavored scone mixes
- Eggnog streusel muffin mix
- Holiday shaped pasta
- Peppermint chocolate piroutte cookies
- Peanut butter filled, chocolate covered pretzle bites 
I use this collection to make several festive weekend breakfasts during December and we celebrate will little holiday themed meals and snacks all month long. These are all treats I'd likely find myself buying anyways over the course of the month. Bundling them together and putting them on a bright red platter underneath our stockings just makes them stand out as that much more special. I love that it also promotes sharing our treats together. 
What does your family enjoy most? Your gift basket could include:
- Hot cocoa and new mugs with fun pepperment stir sticks and marshmallows
- Holiday baking basket with packaged cupcake wrappers, mixes, and various sprinkles or cookie cutters and parchment paper
- Gingerbread house decorating basket with plenty of candies for coating it roof to base
Chances are likely these are things you'd be doing this season anyways. It's just all in the presentation!
Are you looking for other St. Nick ideas and Advent inspiration? 
Let's Lasso the Moon is sharing a fantastic printable with activities and games to do with your kids that will make more of the Christmas season.
Diet & Ridicule is sharing some healthy ideas to fill stockings for St. Nick. 
Then be sure to check back again the coming weeks as we really dig in on the holiday shopping lists!
Wednesday, December 7, 2011

Playroom Make Over Part 2

A few weeks ago I discussed making over our playroom.  If you missed the post check it out here: sensory-table-and-new-playroom.

Part of my inspiration for the new playroom came from The Reggio Emilia Approach.  One of many things this philosophy promotes is making items/toys accessible to children.  For me this meant purging and organizing.

One of the areas I focused on was our art corner. Previously all the materials were just thrown in bins and if the girls wanted to use them we had to sift through all the bins to find what we wanted.  There was really no rhyme or reason to it and some of the materials I even forgot we had.

Here is one wall of the new and improved art area.

IMG_7100

The shelves were actually old cd shelves that were just sitting in our storage area completely unused. I had my hubby nail them to the wall and I organized all the material so that they could be seen by the girls and easy for them to take down and put back. Part of The Reggio philosophy is to have as many natural and real material as possible. We are still a work in progress but in the mason jars are rocks, shells, gems and wooden pieces for the girls to explore. The girls need to be supervised when using the mason jars, especially my 20 month old but they love exploring the materials in them.

Above the art shelves I placed some signs with questions. I use to have the signs in my pre-k classroom and often referred to them when guiding the children. Nothing ground breaking here but it reminds me to ask open ended questions while I am interacting with them during play. Sometimes I fall into being reactive with the girls play...answering their questions but not challenging them to think further. These questions among others not listed here really help with guiding them to think outside the box. "How might you make that tower bigger?", What did you do to make the color pink?", "Why do you think the puzzle piece doesn't fit there?", "What would happen if I added eggs to the flour?" etc.

IMG_7095

After organizing the new playroom we also had fun decorating it! I bought some canvases at Michaels and had the girls paint them to hang on the walls in the playroom. They loved it and really enjoy seeing their work displayed.

IMG_7089

IMG_7082

IMG_7087

IMG_7080

IMG_7070

IMG_7088

The completed projects displayed.

IMG_7090
Monday, November 28, 2011

Holiday Traditions Series- Hot Chocolate Bar


The Holiday season is upon us and I would like to do a series of posts (1 each week) featuring ideas for holiday traditions, some that I have started with my own family others that I would like to start someday.

The first one is tree decorating complete with a hot chocolate bar.  We did this last night for the first time and I would love to make it a family tradition.  

I made a big deal about it, hyping it up to Mallory. I told her after her nap we would decorate the tree and make our very own hot chocolate bar! She was super excited about both!

There are so many various ways to do this but we kept it pretty simple and I'm sure as the girls get older it will be altered through the years.  For now we bought instant hot coco (when the girls are older I would like to try home made hot coco).  The toppings included tiny marshmallows, chocolate chips, whip cream, and Xmas sprinkles and candy canes. I pulled out our festive holiday mugs. I bought the cute santa cups at Target and the real mugs for the grown ups are from Pier 1.

Again, ideas for toppings are endless- chocolate shavings, toffee chips, peppermint candy, ice cream, nuts etc..

IMG_6909

The girls were able to choose what they wanted to put in their hot coco. They LOVED this!

IMG_6913

IMG_6926

IMG_6931

All ready to enjoy as we decorate the tree!

IMG_6915

IMG_6919

The first of many family traditions we will do this season!  Simple and easy but hopefully memorable! Stay tuned for more various traditions shared in the coming month!
Wednesday, November 16, 2011

Sensory Table and New Playroom

This will be the first of a few posts showcasing my new Reggio Emilia inspired playroom.

If you would like to learn more about the Reggio Emilia Approach check out this site: www.education.com/magazine/article/Reggio_Emilia/

While I would love to say we have a huge playroom with lots of natural light and big beautiful windows the reality is it's in a small space in our basement that's shared with our laundry area.  Since we moved here a year ago it has been a dumping grounds so to speak for all the toys we own in the house.  I didn't like going down there, it was cluttered and unorganized.  Using my own experience working in a Reggio Emilia school as well as inspiration from this site playathomemom3.blogspot.com I set out to transform the playroom into an inviting organized space for my girls.

This first thing I did was purge.  I went through all the toys that are broken, missing parts, "Junk" type toys and got rid of them.  I also filled a bag with good toys- some still in their packaging and set those aside for Good Will.

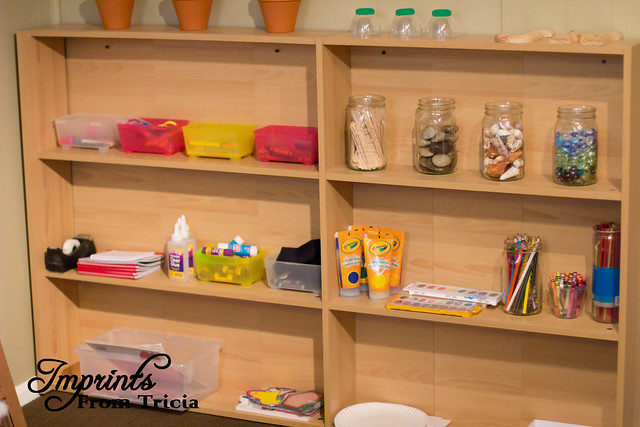
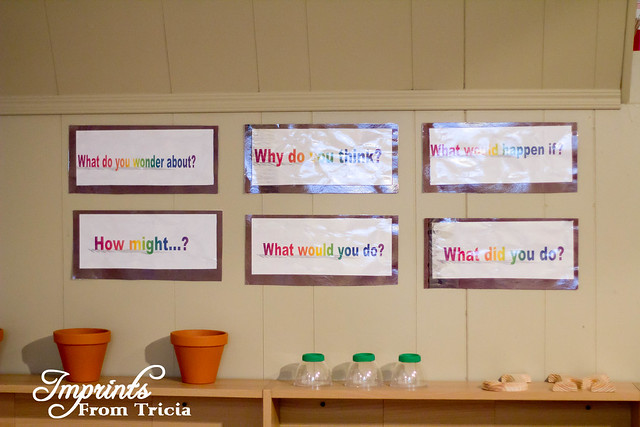
The philosophy behind the new playroom was to make it an inviting pretty environment.  If I felt the chaos being down there certainly my girls did too.  It's really about setting things up for purposeful play, providing as many natural materials for exploration, and most important (in my opinion) is to have items/toys accessible.

I took the girls down to the new playroom last night and the reaction was incredible.  They LOVED it down there, were incredibly engaged and we only scratched the surface with the new experiences I set up.

It's still a work in progress but I wanted to share a few things I've done so far.

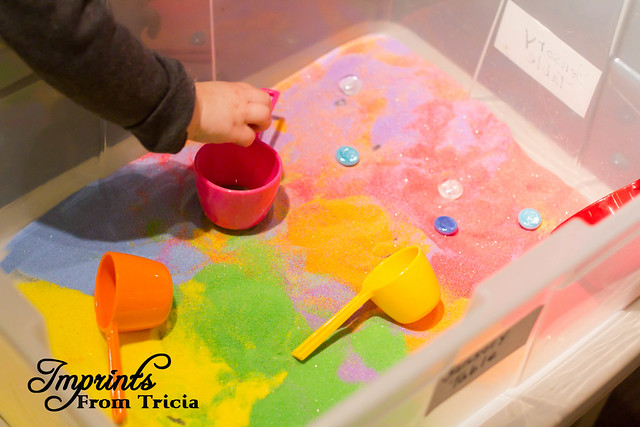
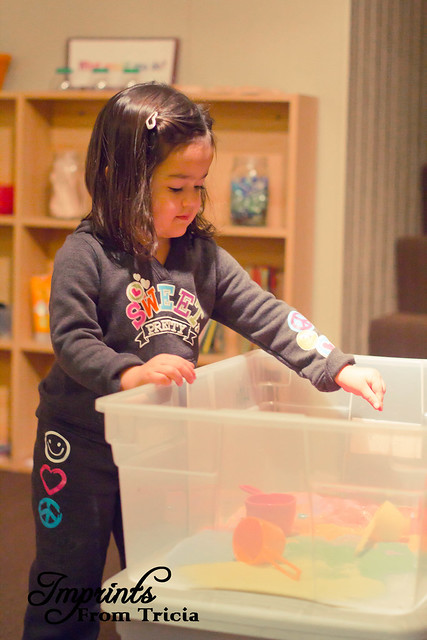
The sensory table!  This is my homemade super cheap sensory table.  As you can see it's really just an old bin I had in our basement.  There are many items you could out in a sensory table but I started it off with colored sand, measuring cups, and some gems.  My 1 1/2 year old had to be closely monitored to make sure she didn't stick the sand or gems in her mouth, but she loved it just as much as Mallory.

IMG_5750

IMG_5745

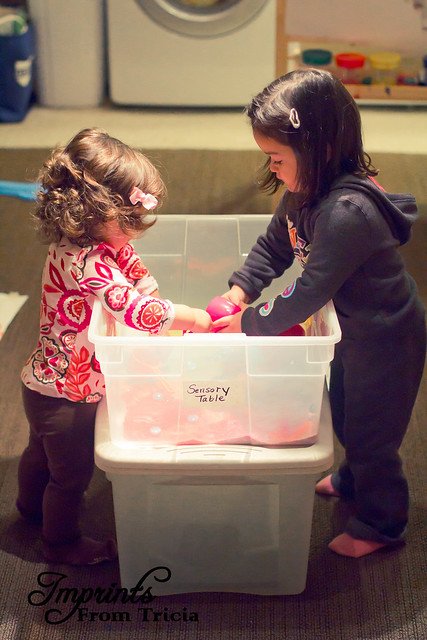
Mallory played with it for at least a half hour!

IMG_5744

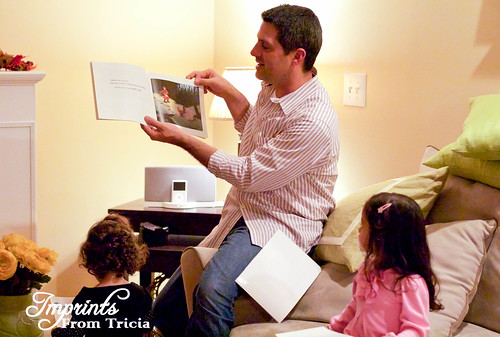
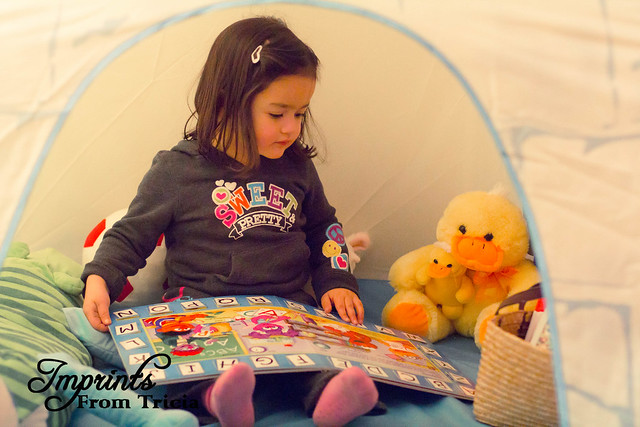
I also used the girls tent to create a cozy reading area in the playroom.  They looked at books in there that had been down in the play area for the last year but were rarely looked at.

IMG_5755

IMG_5757

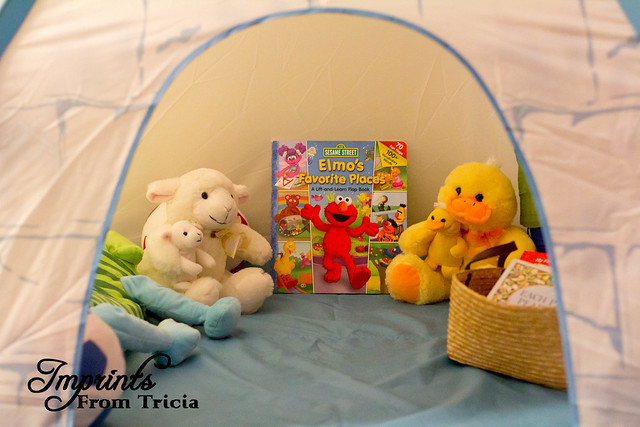
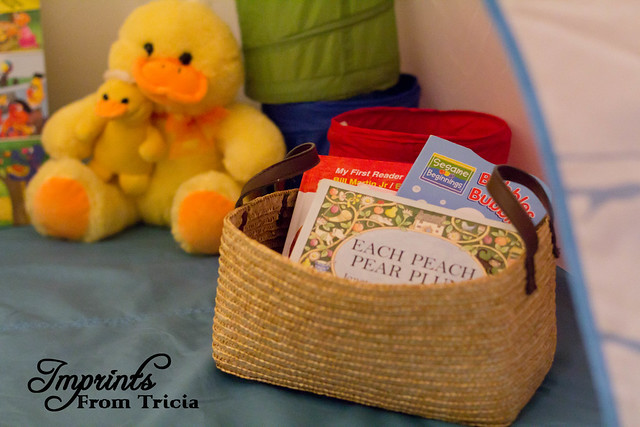
Again it was about presenting them in an accessible manner, "inviting baskets" and displaying them in a cozy place. Case in point, Mallory yelled with delight "I remember this book." and proceeded to sit down and read it. The book had been in the play area all along before the transformation but by presenting it in a different way she thought it had been lost and found again!

IMG_5763

Here are some more ideas for sensory table items: styrofoam, shaving cream, snow, water, pine cones, shredded pieces of paper, sticks/twigs, leaves, uncooked noodles, bubbles, the list is endless!

Stay tuned for more playroom ideas!
Thursday, October 27, 2011

Ghost Toast

Here's a quick little Halloween treat that the kids can help make.

Materials - slice of white cheese (we used mozzarella), slice of bread, raisins, ghost cookie cutter, toaster oven

Mallory placed the cheese on her bread
IMG_4306

I helped her place the cookie cutter over the cheese and bread and cut out the ghost shape.
She placed the raisins for the eyes.

IMG_4307

Mallory also decided she wanted a nose, the one on the left is Jillian's (She helped a little but I did most of it for her since she's only 19 months).
IMG_4309

We placed it in the toaster oven and watched the cheese melt. Mallory noticed it looked different after we brought it out of the oven. So I asked open ended questions like "Why do you think it looks different?", "What do you think happened to it while it was in the oven?"etc.
IMG_4310

The best part was eating it! YUM!
IMG_4311
Thursday, October 20, 2011

Pudding Fingerpainting

This is one is super easy and super fun and delicious for the kids!

Materials-  any brand of pudding, wax paper, trays

After I made the pudding I placed it on trays (these trays were purchased at Michaels but you can use any tray or cookie sheet)  topped with wax paper.

This is a great way to have fun with making letters and shapes.


IMG_3475

I demonstrated how to make letters with the M and A- Mallory made the O.
IMG_3478


Jillian who is only 18 months was mimicking Mallory trying to make an O! IMG_3473

The best part was licking your fingers!
IMG_3481

IMG_3483
Monday, October 17, 2011

a Halloween Story Extension

When I used to teach preschool I LOVED reading stories and doing extension activities related to the book; acting it out, making an art project, making a recipe, etc.

This is one of my favorite Halloween books for early childhood.


The Little Old Lady Who Was Not Afraid Of Anything by Linda Williams.

You can find it here on Amazon: The Little Old Lady Who Was Not Afraid Of Anything

The book is full of repetition which the kids love and it makes for a great story extension of "acting out" as you read aloud.

In the story the little old lady comes across two shoes that go clomp clomp, one pair of pants that go wiggle wiggle, one hat that goes nod nod, one pair of gloves that go clap clap and one scary pumpkin head that go Boo Boo.

The objects and sounds/actions they make are repeated throughout the story.  I made a sign for each of them, drew a picture and wrote the corresponding phrase under each one.  

Each participant was assigned a card- in our case we had grandma and grandpa help out to fill all the spots.

My husband read the story out loud.

IMG_2725


Mallory was the shirt so when my husband read "and the shirt went... Mallory then held her sign up and said "shake shake!"....and so on with each participant and their part.

IMG_2733


Grandma was the hat that went nod nod.

IMG_2734


Papa was the shoes that went clomp, clomp.

IMG_2738


Daddy was also the pants that went wiggle wiggle and we are all together the big scary pumpkin head that went boo boo.

I can't even begin to describe how much Mallory enjoyed this simple story extension. I had already had the signs made from my years teaching but it's so easy to put together some for yourself.

What a great way to celebrate books by providing an all family fun activity!

Halloween Cookie Cutter Painting

Clearly this not ground breaking- it's been done before, many times!   But it's simple, and fun and great for a wide variety of ages, as you will see in the photos my 18 month old and my 3 year old enjoyed it!  It's messy but the girls loved it!!

Materials


A variety of Halloween cookie cutters ( we used two different kinds)
orange and black paint
Paper ( we used glossy finger painting paper)

Dip the cookie cutters in the paint and make prints all over the paper.  With children 3 and under this will inevitable turn into finger paint!

This obviously could be adapted to all sorts of holidays, Easter cookie cutters with pastel colors, Christmas cookie cutters with green and red etc..

IMG_2709


IMG_2689


IMG_2691


IMG_2698


IMG_2704


Note to self: put down newspaper next time- it wasn't too bad though- the paint easily came off!